Table of Contents
- Why Car Seat Rips Matter at Lease Return
- BVRLA Fair Wear and Tear Guidelines for Interior Damage
- DIY vs Professional Repair for Car Seat Rips
- Step-by-Step: How to Fix Car Seat Rips Yourself
- How to Fix Scratched Plastic Dashboard Trim
- Car Interior Repair Cost: What to Expect
- Common Mistakes to Avoid When Repairing Car Seat Rips
- Frequently Asked Questions
Last Updated: October 2, 2026
Why Car Seat Rips Matter at Lease Return
A torn seat can turn a simple handback into a bill. When you return a leased car, the finance company inspects the interior, and any rip bigger than normal wear becomes chargeable damage. The best way to fix car seat rips for lease return is to repair them before the inspection, not after.
At TrimKings, we see this every week across the West Midlands. A small split in the driver’s bolster or a cigarette burn in the back seat gets flagged, and the driver pays far more than a repair would have cost.
Here’s the key point most drivers miss: the inspector isn’t judging your car against a showroom model. They’re judging it against a clear written standard. Meet that standard and you owe nothing.
Fixing car seat rips before the lease-end inspection is almost always cheaper than paying the damage charge. Repair first, return second.
BVRLA Fair Wear and Tear Guidelines for Interior Damage
The BVRLA fair wear and tear guidelines are the industry standard used to judge returned lease vehicles. The BVRLA is the trade body for vehicle rental and leasing, and its guide sets out what counts as acceptable wear versus chargeable damage.
The official guide is the source of truth here. You can read the current version at BVRLA Fair Wear and Tear Guide.
In short, the guide exists to protect both sides.
What Counts as Fair Wear vs Chargeable Damage
Fair wear is damage you’d expect from normal, careful use. Chargeable damage goes beyond that.
| Damage Type | Fair Wear | Chargeable |
|---|---|---|
| Seat fabric | Light fading, minor creasing | Rips, tears, burns, cuts |
| Leather seats | Gentle creasing, slight softening | Scuffs through the surface, splits, holes |
| Dashboard trim | Light surface marks | Deep scratches, cracks, missing pieces |
| Stitching | Slight loosening | Seam separation |
DIY vs Professional Repair for Car Seat Rips
DIY works for small, simple damage on robust materials. Professional repair wins for anything visible, deep, or on leather. The deciding factors are the material, the size and depth of the rip, and how soon your lease ends.
Match the method to the material
Not all seat materials behave the same way, and the wrong method can make damage worse.
A simple decision guide
- Small vinyl split, under 2cm: DIY patch kit is fine.
- Leather tear or burn: professional, because colour and grain matching is hard.
- Rip on a seam: professional, as seam separation needs proper stitching.
- Perforated leather: professional, because patching holes ruins the pattern.
- Cloth pull or small tear: DIY is viable, but trim frayed edges first.
- Lease ends in under a month: professional, for a fast, clean finish with time to cure.
Tools and Materials for DIY Repairs
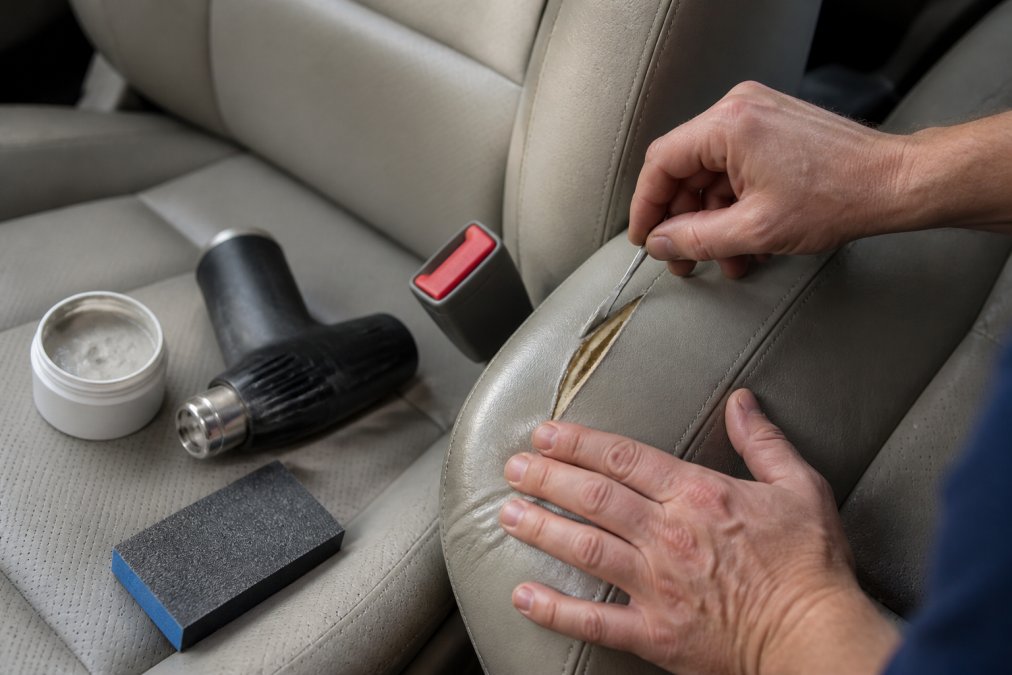
A basic repair kit covers most small jobs. You’ll need:
- Leather or vinyl repair kit with colour match
- Leather filler for deeper holes
- Vinyl adhesive for splits
- Isopropyl alcohol for surface preparation
- Sanding block with fine grit
- Heat gun or hairdryer
- Upholstery needle and nylon thread for seams
- Clean cloths
Skipping surface preparation is the top reason DIY patches peel within weeks. Clean the area with isopropyl alcohol and let it dry fully before you apply anything.
Durability under lease-return scrutiny
A DIY patch only has to survive one inspection, but that inspection is close and unhurried. Inspectors check for colour mismatch, texture mismatch, lifting edges and blocked perforations, not just the presence of a repair. A patch that looks acceptable in your driveway can look obvious under an inspector’s lamp.
Step-by-Step: How to Fix Car Seat Rips Yourself
Follow these steps for small vinyl or fabric rips. Work in good light and take your time.
- Clean the area. Wipe the rip and surrounding seat with isopropyl alcohol. Let it dry.
- Trim loose threads. Snip any frayed edges so the patch sits flat.
- Add a sub-patch. Slide a backing patch under the rip to support the repair.
- Apply filler. Press leather filler or vinyl adhesive into the gap. Build it in thin layers.
- Level the surface. Once dry, sand gently with a fine sanding block.
- Match the colour. Apply leather dye or colourant in thin coats until it blends.
- Recreate the grain. Press a grain texture stamp into the filler while it’s still soft.
- Seal and cure. Use a heat gun briefly, then let the curing agent set fully.
Leather vs Vinyl Repair Techniques
Leather and vinyl need different handling. Leather is porous and takes dye well, but it tears along grain lines and needs flexible filler. Vinyl is a synthetic leather surface that responds better to adhesive patches and heat, but it can melt if you overdo the heat gun.
How to Fix Scratched Plastic Dashboard Trim
Light scratches on plastic trim often polish out. Deep ones need filling and refinishing. This matters at lease return because scratched dashboard trim is a common charge.
Try this order:
- Start with a plastic polish and a soft cloth
- For deeper marks, use a fine sanding block, then polish
- For cuts, fill with a plastic repair compound and refinish
- Match the finish, matte or gloss, or it will show
Car Interior Repair Cost: What to Expect
Car interior repair cost depends on the damage, the material, and how many panels are involved. There is no single figure, because a small vinyl patch and a full leather seat refinish are very different jobs. But you can still work to a decision threshold rather than a vague guess.
Typical price bands in the UK
Most independent trim specialists price by job, not by the hour.
The cost-benefit threshold that actually matters
At lease return, the finance company does not charge you the retail cost of a new seat. It charges an excess wear and tear amount, assessed against the BVRLA fair wear and tear guidelines. That figure is usually a fixed, published rate per damage type, not a quote for the repair itself.
The practical rule most drivers should apply:
- Get the repair quote first. A photo quote takes minutes.
- Get the likely charge second. Ask the leasing company or check your lease-end documentation for the excess wear and tear schedule.
- Repair if the quote is clearly below the charge. This is the common case for small to mid-size damage.
- Consider leaving it if the quote exceeds the charge. Rare, but it happens on very minor marks that fall inside fair wear.
- Never leave chargeable damage unrepaired on the assumption it will be missed. Inspectors work to a written standard, and rips, burns and cuts are explicitly chargeable.
Get your repair quote before the lease-end inspection, not after. Once the inspector logs the damage, your bargaining position disappears.
What pushes the cost up
- Colour matching on faded leather. A seat that has seen years of sunlight needs a blended dye, not a single shade.
- Perforated surfaces. Filler blocks the holes, so the repair is slower and more skilled.
- Seam and bolster damage. High-wear areas need reinforcement, not just a cosmetic patch.
- Multiple panels. Each additional area adds labour and materials.
- Timing. A repair booked days before inspection leaves no curing margin, which can force a rush job or a substandard finish.
Compare all of this against the alternative. Replacing a seat or a trim panel usually costs far more than a repair, and the lease company may still charge you for the damage if you do nothing. Repairing early, with time to cure, is almost always the cheaper path.
Common Mistakes to Avoid When Repairing Car Seat Rips
Most failed repairs come down to a handful of avoidable errors. Here are the ones we see most.
- Wrong colour match. A patch that’s a shade off looks worse than the rip.
- No surface prep. Adhesive won’t bond to a dirty or greasy seat.
- Too much heat. A heat gun can melt vinyl or scorch leather.
- Filling perforated leather. It blocks the holes and ruins the pattern.
- Ignoring seam separation. A patch over a split seam will fail again.
- Repairing too late. Leave no curing time before the inspection and it may not hold.
Frequently Asked Questions
Do leather repair kits actually work for lease returns?
Leather repair kits can work for small rips and scuffs, but their effectiveness depends on the damage severity and your skill. For lease returns, the repair must meet BVRLA fair wear and tear guidelines. Minor damage (under 10mm) is often acceptable, but larger rips may need professional repair to avoid charges. DIY kits are best for superficial damage; professional services ensure a seamless finish that passes inspection.
How much does it cost to fix a ripped leather car seat?
Car interior repair costs vary based on damage type, location, and whether you choose DIY or professional. For a quote tailored to your car, send a photo to a mobile repair service like TrimKings. They offer no-obligation assessments and can often repair at your home or workplace.
Can you repair car seats yourself before a vehicle inspection?
Yes, you can repair car seats yourself using DIY kits, but success depends on the damage. For small tears, a leather filler and colorant can work. However, if the rip is large or on perforated leather, DIY may look patchy and fail inspection. Practice on a hidden area first, and consider professional help for critical lease returns to ensure the repair meets BVRLA standards.
What interior damage is covered under fair wear and tear?
Under BVRLA guidelines, fair wear and tear includes minor scuffs, small tears (usually under 10mm), and slight discoloration from normal use. Damage like large rips, burns, or stains that affect the vehicle’s value are chargeable. Always check your lease agreement for specific thresholds. Keeping your interior clean and addressing small issues early can prevent them from becoming chargeable at lease end.
A torn seat shouldn’t cost you a lease penalty. TrimKings repairs rips, burns, scuffs and dashboard damage at your home or workplace, with seamless colour matching for leather and upholstery and a fast turnaround that keeps your day moving. As a cost-effective alternative to replacement parts, we help you avoid end-of-lease charges with minimal disruption. Get a quote from TrimKings and hand back your car without the worry.