Last Updated: October 24, 2026
Quick Summary
Car leather repair can fix minor damage like small tears under 5mm, light scuffs, and cigarette burns without full seat replacement, saving thousands of pounds and preserving your vehicle’s resale value. Most stains, scuffs, and burns respond well to proper cleaning or repair kits when addressed early.
- Light scuffs and surface stains can often be fixed with leather conditioner, gentle cleaning, or DIY repair kits costing significantly less than replacement
- Tears longer than 10mm, deep burns over 10mm, and seam damage require professional repair rather than DIY attempts
- Cigarette burns smaller than 5mm respond to fine sanding and colour-matched compound applied in thin layers
- Professional repair is recommended for light-coloured leather, luxury vehicles, and highly visible areas like seat edges and armrests
- Quality leather repair kits must include colour-matched compound, flexible filler, 220-grit or higher sandpaper, and protective coating for lasting results
Table of Contents
- Why Car Leather Repair Matters for Your Vehicle’s Value
- How to Clean Stained Car Leather Seats
- Leather Seat Scuff and Tear Repair: Assessment and Options
- Fixing Cigarette Burns and Heat Damage
- Car Leather Repair Cost: Repair vs Replacement
- Car Leather Repair Kit Essentials: What Actually Works
- When to Stop DIY and Book a Mobile Repair Service
- Getting a Professional Quote for Your Leather Interior
- Frequently Asked Questions
Why Car Leather Repair Matters for Your Vehicle’s Value
Your car’s leather seats take a beating. Daily use, sunlight exposure, and accidental damage wear them down over time. Many vehicle owners assume that once leather gets scuffed, torn, or stained, replacement is the only option. That’s not true. Many owners save thousands of pounds by repairing their leather interiors instead of replacing them.
A damaged leather interior directly impacts your vehicle’s resale value. Buyers notice worn seats immediately. They factor repair costs into their offers, often deducting far more than the actual repair would have cost. For lease holders, interior damage means hefty end-of-lease charges from the dealership. Cigarette burns, scuffs, and tears are among the most common issues we repair, and they’re also the easiest to prevent from becoming expensive problems.
The good news: most leather damage doesn’t require replacement. Small tears, scuffs, stains, and even cigarette burns can be restored to near-original condition with the right approach. Understanding what you can fix yourself versus what requires professional attention is the key to maintaining your vehicle’s value without overspending.
How to Clean Stained Car Leather Seats
Stained car leather seats often look worse than they are. Before you assume permanent damage, try proper cleaning. Many stains respond well to simple methods that cost just a few pounds.
Start by identifying the stain type. Ink, coffee, grease, and mud each require different approaches. For general dirt and dust, use a soft brush or microfibre cloth with gentle circular motions.
For water-based stains like coffee or juice, mix warm water with a small amount of mild soap. Dampen a cloth (not dripping wet) and gently work the solution into the stain.
Oil and grease stains need a different strategy. Sprinkle baking soda or talcum powder on the stain and let it sit for 30 minutes to absorb the oil.
Ink stains are trickier. Never rub them aggressively, as this spreads the ink further. Instead, dab gently with a cloth slightly dampened with rubbing alcohol.
The key to cleaning stained car leather seats is patience. Avoid harsh chemicals, excessive water, and aggressive scrubbing. These damage the leather’s protective coating.
Leather Seat Scuff and Tear Repair: Assessment and Options
Identifying scuff severity
Scuffs range from minor surface marks to deep scratches that expose the underlying material. Learning to assess severity helps you decide whether DIY repair makes sense.
Light scuffs show as surface discolouration but don’t break the leather’s protective layer. These often respond to leather conditioner or a gentle polish.
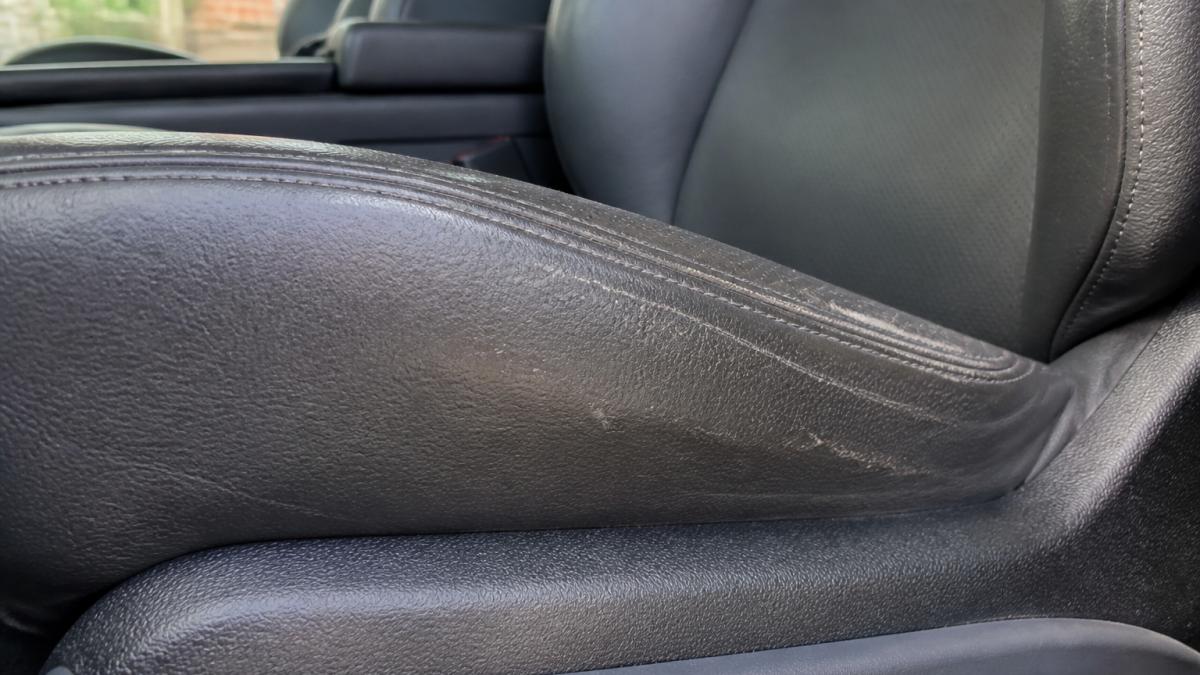
Medium scuffs create visible texture changes and may show slight colour variation. The leather surface is compromised but not broken through.
Deep scuffs expose the base material beneath the leather’s protective finish. These are more noticeable and harder to hide. Deep scuffs often benefit from professional attention, particularly on light-coloured leather where colour matching is critical.
Run your fingernail gently across a scuff. If your nail catches or the damage feels rough, it’s deeper than surface level. If it feels smooth but looks discoloured, it’s likely a light to medium scuff.
When tears require professional attention
Small tears, under 5mm, can sometimes be managed with adhesive repair kits. Once dry, you can apply colour-matched compound to blend the repair. Learn step-by-step techniques for assessing and repairing leather cracks and tears.
Larger tears or those on seams and edges are different stories. Seam tears spread quickly under pressure from sitting and movement. Edge tears on armrests or seat edges are visible from every angle, making imperfect repairs obvious.
The location of a tear matters as much as its size. The same tear on a seat edge or near a seam is a permanent eyesore if not done professionally. Learn how to fix cigarette burns in car seats with fabric adhesive, fibre matching and colour blending.
Before attempting tear repair yourself, consider the leather type. Thick, durable leather is more forgiving of amateur repair attempts. Thin, delicate leather, common in luxury vehicles, requires precision that’s hard to achieve without proper tools and experience.
Leather damage falls into categories based on severity, with different repair approaches for each.
| Damage Type | Severity | DIY Suitable | Professional Recommended |
|---|---|---|---|
| Light scuffs | Surface discolouration only | Yes | No |
| Medium scuffs | Visible texture, colour variation | Yes | Optional |
| Deep scuffs | Exposes base material | No | Yes |
| Small tears | Under 5mm | Yes | No |
| Medium tears | 5-10mm | Optional | Yes |
| Large tears | Over 10mm | No | Yes |
| Seam or edge tears | Any size | No | Yes |
Fixing Cigarette Burns and Heat Damage
Cigarette burns are among the most common leather interior damage we see. They range from small surface discolouration to deep pits that go through the leather.
Light burns show as small brown or black marks without depth. These often respond to gentle sanding with very fine sandpaper (220-grit or higher) followed by colour-matched compound. Sand lightly in circular motions, then apply compound to restore colour and texture.
Deeper burns create visible pits or holes. These require filling before colour matching. Use a leather repair kit’s filler compound to build up the damaged area, allow it to cure, then sand smooth.
Burns larger than 10mm or those that go completely through the leather are beyond practical DIY repair. Professional restoration involves removing damaged material, applying backing, filling, colour matching, and finishing, a multi-step process that requires skill and equipment. Discover detailed step-by-step guidance for repairing cigarette burns in car upholstery.
Heat damage from cigarettes, sunlight, or contact with hot objects appears as discolouration or texture changes without necessarily creating visible damage. Early heat damage responds well to conditioning and UV-protective treatments.
Prevention is far easier than repair. Use sunshades, avoid placing hot objects on leather, and address cigarette burns immediately before they spread. The longer a burn sits, the more the damage oxidises and spreads beneath the surface.
Car Leather Repair Cost: Repair vs Replacement
The decision between repair and replacement depends on damage extent, leather type, and your vehicle’s value.
Minor repairs, cleaning, light scuff removal, small tear patching, cost significantly less than replacement.
Moderate damage like cigarette burns, medium tears, or extensive staining costs more. Professional cigarette burn repair or tear repair on a single seat section can be far cheaper than replacement.
Replacement seats are expensive. Replacing all seats in a vehicle can be a significant investment, with additional labour costs for removal and reinstallation.
For lease holders, the calculation is straightforward: repair to avoid end-of-lease charges. Dealerships may charge penalties for damage at lease end.
For owned vehicles, consider resale value. The discount often exceeds repair costs. Understand mobile leather seat repair costs, damage types, and repair vs replacement options.
For luxury or classic cars, repair preserves originality better than replacement. Vintage leather develops character over time. Restoration maintains that patina while fixing damage.
The break-even point is roughly 40-50% damage to a seat. Below that, repair makes financial and practical sense.
Car Leather Repair Kit Essentials: What Actually Works
Not all leather repair kits are equal. Cheap kits often produce visible, poor-quality repairs that look worse than the original damage.
Quality matters more than brand name. A good kit includes colour-matched compound, filler, fine sandpaper, and applicator tools. The colour matching is critical.
Filler compound should be flexible once cured. Rigid fillers crack and chip under the movement and pressure of sitting.
Sandpaper grit matters. Use 220-grit or higher for final smoothing. Coarser grits scratch leather visibly.
Applicator tools should include small brushes for precise compound application and soft cloths for blending. Cheap kits often include poor-quality applicators that make precise work difficult.
Many kits include protective coating. This seals the repair and protects it from further damage.
Test any kit on a small, inconspicuous area first. This lets you see how the colour matches and how the repair looks before tackling visible damage.
The most common mistake is applying too much compound at once. Build repairs in thin layers, allowing each to cure before adding more.
When to Stop DIY and Book a Mobile Repair Service
DIY repair works well for minor damage in inconspicuous locations. As damage grows in size, visibility, or complexity, professional repair becomes the better choice.
Stop DIY and seek professional help if damage is on highly visible areas like seat edges, armrests, or steering wheel leather. Imperfect repairs are obvious in these locations.
Tears longer than 10mm, deep burns, or damage affecting multiple areas benefit from professional assessment. What looks like isolated damage might be connected beneath the surface.
Colour matching on light-coloured leather, beige, cream, or white, is extremely difficult without professional equipment. These colours show imperfect matches instantly.
If you’ve already attempted a repair that didn’t work, professional restoration can often fix the previous attempt.
Luxury vehicles warrant professional repair. The leather quality is higher, the interior more valuable, and the cost of mistakes higher. Professional repair preserves the vehicle’s value and appearance.
Getting a Professional Quote for Your Leather Interior
A professional quote clarifies costs before work begins. This prevents surprises and helps you decide whether repair makes financial sense.
Provide clear photos showing the damage from multiple angles. Close-up photos reveal damage extent better than wide shots.
Describe the damage type: tear, scuff, burn, stain, or combination. Mention the leather colour and any previous repair attempts.
Expect the professional to ask questions about damage age, cause, and how it’s progressed. This information helps them plan the most effective repair strategy.
A quality quote includes damage assessment, repair method, materials needed, labour time, and total cost. It should specify colour matching approach and protective finishing.
Most professionals offer no-obligation quotes. This lets you compare options without commitment. TrimKings provides competitive quotes based on photos you send.
Ask about warranty or guarantee on the repair. This gives you confidence that the repair will last and look professional.
Professional car leather repair preserves your vehicle’s value, comfort, and appearance. Minor damage that you can assess and repair yourself saves money and time.
Frequently Asked Questions
How much does it cost to repair leather seats in a car?
Car leather repair cost depends on damage type, extent, and leather condition. Minor scuffs, tears, or cigarette burns can often be repaired more cost-effectively than replacing seats entirely. For accurate pricing on your specific damage, send a photo to a mobile repair service for a no-obligation quote tailored to your vehicle and damage.
Can a tear in a leather car seat be repaired?
Yes, most tears can be repaired professionally. Small tears (under 5cm) often respond well to invisible repair techniques with colour matching. Larger rips may need patching or stitching. The success depends on tear location, leather type, and whether it’s a clean cut or jagged edge. Professional assessment determines the best repair method for your specific tear.
How do you clean stained car leather seats?
Start by vacuuming loose debris. Test any cleaner on a hidden area first. Use a pH-balanced leather cleaner with a soft brush for light stains, working in circular motions. For stubborn marks, apply the cleaner and let it sit briefly before wiping. Condition the leather after cleaning to restore moisture. Avoid harsh chemicals or excessive water, which can damage the finish.
Is it better to repair or replace a damaged leather car seat?
Repair is usually more cost-effective and faster than replacement, especially for cosmetic damage like scuffs, burns, or small tears. Replacement requires removing and installing new seats, which is disruptive and expensive. Professional repair restores appearance while preserving your original interior. Choose replacement only if damage is structural, leather is severely degraded, or the seat mechanism is faulty.