Table of Contents
- Assessing Your Dashboard Damage: Understanding Scratch Depth and Type
- Preparing Your Dashboard: Cleaning and Surface Preparation
- How to Remove Car Plastic Scratches: Sanding and Smoothing Techniques
- How to Repair Vinyl Dashboard Scratches: Material-Specific Approaches
- Using a Car Dashboard Scratch Repair Kit: Products and Tools
- Dashboard Scratch Repair Cost: DIY Versus Professional Solutions
- Common Mistakes to Avoid When Repairing Dashboard Scratches
- Frequently Asked Questions
Last Updated: October 15, 2026
Assessing Your Dashboard Damage: Understanding Scratch Depth and Type
Before you fix car dashboard scratches, understand two things: the depth of the damage and the material it sits in.
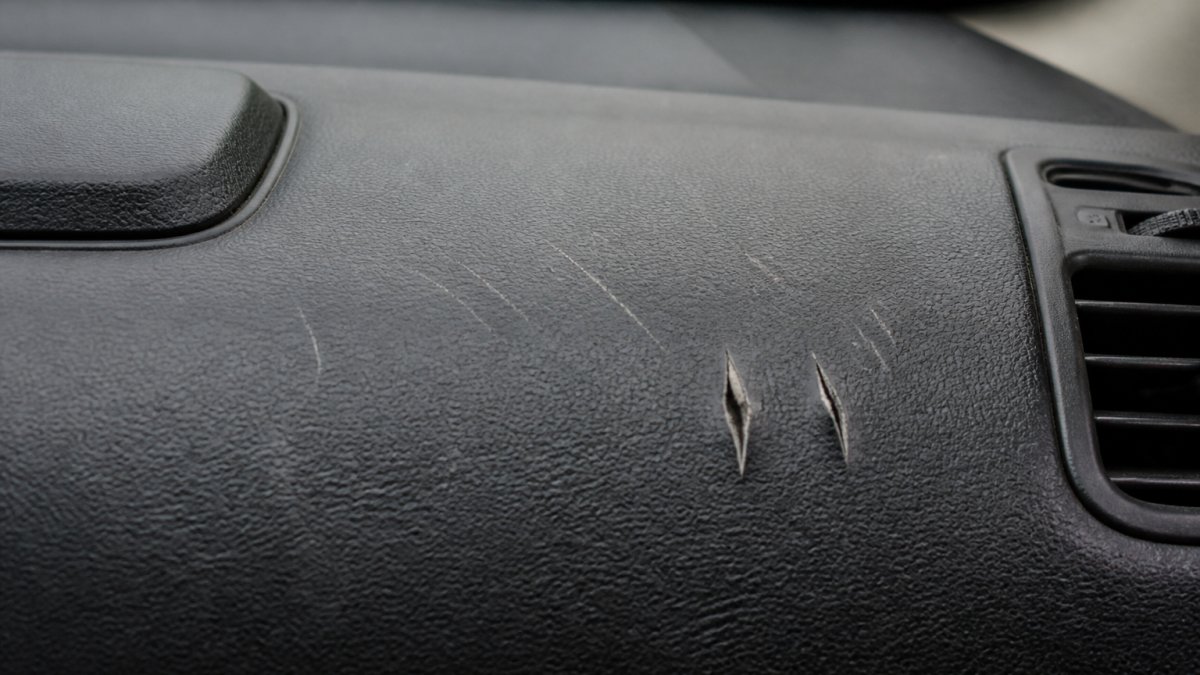
A scratch-depth decision guide
Work through these four categories in order, stopping at the first match.
1. Scuff or surface haze. Visible only at an angle, smooth to a fingernail, and disappears when wet.
2. Shallow scratch. You can feel it with a fingernail but it does not catch. Material is displaced rather than removed, so there is no visible channel.
3. Scratch exposing substrate. You can see a different colour underneath, or a lighter line where the coating has been cut through.
4. Deep gouge or tear. There is a channel, a flap of lifted material, or a depression you can feel with a fingertip.
A quick test: run a fingernail across the mark at 90 degrees. If it glides over, you are in category 1 or 2.
Identifying the dashboard material
Dashboards are not simply plastic or vinyl.
Hard textured plastic. The most common dashboard surface: rigid, cool to the touch, with a moulded grain.
Vinyl skin over foam. Found on older and some luxury interiors. Softer and warmer than plastic, with a slight give when pressed.
Soft-touch coating. A thin rubberised layer over plastic, common on upper dashboards and door tops, feeling slightly tacky and matte.
Leather or leatherette trim. Usually limited to stitched dashboard sections and knee rails.
Painted or lacquered trim. Gloss or satin panels around vents, screens and consoles.
Run your hand across the damaged area: plastic feels rigid and cool, vinyl softer and warmer, soft-touch faintly tacky.
When DIY is unlikely to work
Be honest about the ceiling of a home repair. DIY is usually acceptable for categories 1 to 3 on hard plastic, in a common flat black or dark grey, in a low-visibility area. It is unlikely to satisfy on a category 4 gouge, soft-touch or leather, a metallic or two-tone finish, or damage in the driver’s eyeline, where a failed attempt often costs more than doing it properly.
Take a close-up photo of the damage in good lighting before you start. This helps you track progress and gives you a reference if you need professional help later. It’s also useful when getting a quote from a repair service like TrimKings, which can assess damage severity from a photo.
Preparing Your Dashboard: Cleaning and Surface Preparation
You cannot repair what you cannot see clearly. Dust, dirt and grime hide the true extent of the damage and prevent repair products from bonding.
Vacuum with a soft brush attachment to avoid scratching the surrounding surface, then wipe with a damp microfibre cloth to remove remaining dust and debris.
For stubborn dirt, use a mild soap solution, just a drop of washing-up liquid in warm water. Wipe gently and dry completely. Avoid harsh chemicals or abrasive cleaners, which can damage the dashboard or cause discolouration.
Allow the area to dry completely before repairing, since moisture prevents adhesives and fillers from setting. A hair dryer on low heat can speed this up, but never use high heat at this stage.
How to Remove Car Plastic Scratches: Sanding and Smoothing Techniques
Plastic scratches respond well to controlled sanding. The goal is to smooth the rough edges without removing so much material that you create a depression.
Using fine-grit sandpaper safely
Start with 600-grit sandpaper, fine enough to smooth without aggressive removal. Wet the area lightly: water lubricates and stops the paper clogging. Sand gently in circular motions, not back and forth, which creates visible lines.
Check progress every 10-15 seconds. You’re not erasing the scratch, just smoothing the edges and reducing depth. Once it feels smooth to your fingernail, move to 1000-grit sandpaper.
Never use coarse sandpaper (below 400-grit) on visible dashboard areas. It creates visible scratches that are harder to hide than the original damage. Always start fine and work up only if needed.
After sanding, wipe away all dust with a damp cloth. Let the area dry completely.
Controlled heat application for plastic reshaping
Heat softens plastic slightly, letting minor deformations settle back into shape. A heat gun or hair dryer works, but control is critical.
Set a hair dryer to medium heat, hold it 15 centimetres from the scratch and move it slowly across the area for 30-60 seconds. The plastic should feel warm, not hot: you’re warming it enough to relax and settle, not melting it.
Once warm, press gently on the scratch with a soft cloth for 10 seconds, then let it cool naturally. Minor surface depressions sometimes improve with this method.
Never use a heat gun on vinyl dashboards. The material is more sensitive and will discolour or shrink if overheated.
How to Repair Vinyl Dashboard Scratches: Material-Specific Approaches
Vinyl requires a different strategy than plastic. It’s softer, making it easier to damage but sometimes easier to repair cosmetically.
Vinyl repair products and application methods
Vinyl repair kits typically contain a vinyl filler, colour dye and sealing compound: they fill the scratch, match the colour and create a protective layer on top.
Apply the filler carefully into the scratch with the applicator provided, overfilling slightly so the excess can be sanded smooth. Allow it to cure fully per the instructions, usually 24 hours.
Once cured, sand smooth with 1000-grit sandpaper, wipe away dust and apply the colour dye. Most kits include dyes in common dashboard colours, but matching is not always perfect first time, which is where professional custom colour matching shines.
Colour and texture matching for seamless results
The hardest part of vinyl repair is making the fix invisible. The colour must match the surrounding dashboard, and the texture must feel the same.
Most dashboard vinyl has a specific grain pattern, rough, smooth or a combination. If your repair product dries with a different texture, the fix will be obvious even if the colour is perfect.
Test your repair product first on an inconspicuous area, the underside of the dashboard or an unseen edge, to assess colour match and texture before committing to the visible scratch.
For deeper scratches or difficult colour matching, professional repair makes sense.
Vinyl scratches are notoriously difficult to match at home because of colour variation across the dashboard. What looks like a perfect match in daylight might look obviously different in the car. Professional services reduce this risk significantly.
Using a Car Dashboard Scratch Repair Kit: Products and Tools
Dashboard scratch repair kits bundle the essential tools and products into one package.
Most kits include fine-grit sandpaper, a plastic or vinyl filler, colour-matching dyes and a sealing compound; some add a heat gun or applicator tools. Quality varies widely between budget and premium kits.
Budget kits often contain limited colour options and generic fillers that don’t match dashboard materials precisely, so they frequently leave visible repairs.
Read the instructions thoroughly before opening the kit. Different products have different cure times and application methods. Using them in the wrong order or skipping steps reduces the likelihood of a good result.
Apply products in thin layers rather than thick ones. Multiple thin coats cure more reliably than one thick application.
Dashboard Scratch Repair Cost: DIY Versus Professional Solutions
The cost calculation for dashboard scratch repair comes down to material, time and the risk of an unsatisfactory result.
When to attempt DIY repair
To fix car dashboard scratches on hard plastic, DIY repair makes sense for light scratches: materials are inexpensive, the process is straightforward and the risk of making things worse is low.
If the scratch is small, shallow and on hard plastic, you can attempt repair at home with a basic kit. Budget £15-£30 for a decent kit, £8-£15 for a standalone plastic polish, and a few pounds for wet-and-dry paper in 600, 1000 and 1500 grit.
The advantage is cost savings and convenience: you control the timeline and don’t need to book an appointment or arrange transport.
When professional repair makes sense
Professional repair becomes the sensible choice when the scratch is deep, the material is vinyl or soft-touch, or colour matching is critical.
Vinyl repairs are notoriously difficult to match at home, while professional services have custom colour-matching technology and a wider range of products. If your lease is ending and you face end-of-lease charges for dashboard damage, professional repair is worth the investment to avoid expensive replacement costs.
For luxury or classic cars, professional restoration is almost always right. These vehicles have high-value interiors, and a poor DIY repair can reduce the car’s value more than the original damage.
Time and durability expectations
Set your expectations before you start, because the two routes differ sharply.
A DIY repair on a light plastic scratch is typically a same-day job, but a filled repair needs the filler to cure fully, often overnight, before sanding and dyeing, so plan on two days end to end.
A professional repair is usually completed in a single one-to-two-hour visit, with the vehicle drivable immediately in most cases.
The honest summary: DIY wins on cost and convenience for shallow damage on hard plastic.
TrimKings provides mobile repair services that come to your home or workplace, eliminating the need to take your car to a garage, particularly valuable for busy professionals or those with multiple vehicles.
Common Mistakes to Avoid When Repairing Dashboard Scratches
Understanding what goes wrong helps you avoid the same pitfalls.
Using the wrong grit sandpaper. Coarse paper creates visible scratches harder to hide than the original damage.
Skipping the cleaning step. Dust and dirt prevent repair products from bonding. A thorough clean is non-negotiable.
Applying heat too aggressively. Overheating plastic causes discolouration and shrinkage, and vinyl is even more sensitive.
Rushing the drying and curing process. Most repair products need full cure time.
Ignoring colour matching. A technically perfect repair that’s the wrong colour is still obvious.
Attempting vinyl repair without the right products. Generic plastic fillers don’t work on vinyl.
Dashboard scratches are frustrating, but most are repairable. Light scratches on plastic respond well to DIY sanding and heat treatment.
If you’re facing a lease-end deadline or want a repair that looks genuinely professional, TrimKings specialises in dashboard restoration and interior repair.
Frequently Asked Questions
How do you remove scratches from a car dashboard plastic?
Start by cleaning the area thoroughly with a microfibre cloth and mild soap. For light scratches, use fine-grit sandpaper (220-400 grit) with gentle, circular motions. For deeper scratches in plastic dashboards, controlled heat from a hair dryer can soften the material and reduce visibility. Always test on an inconspicuous area first. Deeper gouges may require plastic filler products designed for interior repair, applied carefully and sanded smooth once dry.
What is the safest way to fix scratches on a vinyl dashboard?
Vinyl requires a different approach than hard plastic. Clean the surface thoroughly, then use vinyl-specific repair products rather than sandpaper, which can damage the material. Apply the repair product according to the manufacturer’s instructions, working in small sections. Once cured, condition the vinyl with a dedicated interior product to restore flexibility and match the surrounding texture. Test any product on a hidden area first to ensure colour and finish match.
Can heat remove scratches from a car dashboard?
Controlled heat can help with light scratches in plastic dashboards by softening the material and allowing minor imperfections to blend. Use a hair dryer on a low or medium setting, keeping it 15-20 centimetres away from the surface. Never use high heat or a heat gun directly on vinyl or leather, as this can cause permanent damage. Heat works best for shallow scuffs; deeper gouges require filler or professional repair.
When should you get a dashboard professionally repaired instead of replacing it?
Professional repair is worthwhile for deep gouges, extensive damage across multiple areas, or when colour and texture matching is critical, especially on luxury or lease vehicles. If you’re unsure about material type, lack the right tools, or the damage affects safety (such as cracks near airbags), professional restoration is the safer choice. Professional services can also match finishes seamlessly and work on leather or high-end materials where DIY mistakes are costly. For lease vehicles facing end-of-lease charges, professional repair often costs far less than replacement panels or penalties.