Table of Contents
- Identifying Dashboard Material: Vinyl vs Plastic
- Tools and Materials Required for Dashboard Repair
- Surface Preparation and Cleaning
- Using a Dashboard Crack Filler for Deep Damage
- Sanding and Smoothing Techniques
- Restoring Texture and Grain with Dashboard Texture Repair
- Colour Matching and Finishing Your Dashboard Repair
- When to Use a Car Dashboard Repair Kit vs Professional Dashboard Repair
- Frequently Asked Questions
Last Updated: October 5, 2026
Identifying Dashboard Material: Vinyl vs Plastic
Before you repair vinyl plastic dashboards, identify what you’re dealing with. Getting this wrong is the most common reason a DIY repair fails within a year.
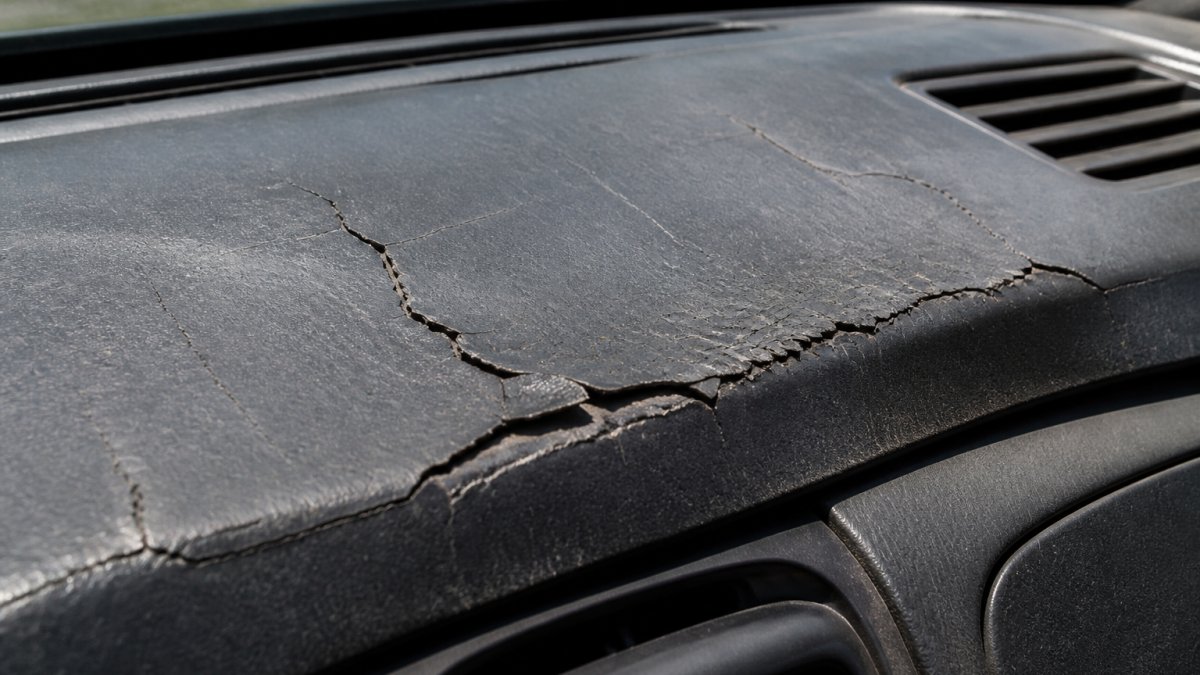
Vinyl dashboards are softer and more flexible, with a grain texture that mimics leather.
Plastic dashboards are harder and more rigid, typically glossy or semi-matte. Plastic cracks in straighter lines and breaks rather than flexes, especially in cold weather.
That two-way split is where most guides stop, which is why so many repairs look obvious six months later. In practice, dashboards fall into four families, each behaving differently under heat, filler and paint:
- Hard-shell vinyl (pre-2000s). A thick, rigid vinyl skin over a foam or ABS substrate. Cracks tend to be long and straight. It accepts flexible filler well but hates aggressive sanding because the skin is thin.
- Soft-touch vinyl (roughly 2005 onward). A thin, rubberised skin over plastic. It feels slightly tacky and dulls quickly. This is the material most likely to blister under a heat gun, so keep the nozzle moving and never hold it in one spot.
- TPO and PP plastics. Common on modern dashboards and door tops. They are olefin-based, which means they have very low surface energy. Ordinary fillers and paints bead off them unless you use a dedicated adhesion promoter first.
- Hard ABS or polycarbonate shells. Found on older commercial vehicles and some budget models. Rigid, smooth and easy to fill, but they expand and contract noticeably in direct sun, so rigid filler can telegraph through as a hairline ridge.
Here’s how to tell which you have:
- Press gently on the surface with your fingernail. Vinyl will show a slight indent that bounces back. Plastic will feel hard and unyielding.
- Look at the texture. Vinyl has a grain pattern, plastic is usually smoother.
- Tap the surface lightly. A hollow, drum-like sound usually means a thin skin over foam. A solid thud means a hard shell.
- Check a hidden edge, such as inside the glovebox aperture or behind a vent trim. If you can see a foam core under a thin skin, treat it as vinyl and use flexible products only.
- Wipe a small hidden area with an alcohol wipe. If the cloth picks up colour, the surface is likely dyed soft-touch and will need a dedicated adhesion promoter before any filler or paint.
Do not assume a modern dashboard is plastic just because it feels hard. Many soft-touch surfaces stiffen with age and UV exposure, and they will still blister under a heat gun. Test on a hidden area first.
At TrimKings, we assess material type first because it determines everything that follows.
Tools and Materials Required for Dashboard Repair
Using the wrong tools will damage the surface further or produce a poor finish.
Essential tools:
- 120-grit and 220-grit sandpaper
- A heat gun (for softening vinyl before filling)
- Plastic scraper or soft brush
- Degreaser (to clean the surface)
- Measuring tape
- Masking tape
- Protective gloves and safety glasses
Materials for the repair:
- Dashboard crack filler or polyurethane filler (for deep damage)
- Flexible adhesive or bonding agent
- Grain texture pad (to match the original texture)
- Colour-matched paint or dashboard dye
- Finishing spray (optional, for a professional look)
Filler choice matters. Rigid fillers work on plastic but re-crack on vinyl, which moves with temperature changes. Flexible fillers stay with the material.
A dashboard texture repair kit typically includes filler, texture pad, and sometimes a colour-matching component, simplifying small DIY repairs.
Professional services like TrimKings use industrial-grade fillers and texture equipment. The tools alone cost more than most DIY kits.
Surface Preparation and Cleaning
This step determines whether your repair lasts or fails, since a poorly prepared surface won’t hold filler or paint.
Clean the entire dashboard with a degreaser, using a soft brush to avoid scratching.
Mask around the damage with at least 15 cm of clearance to prevent overspray and contain the repair.
For vinyl, apply gentle heat with a heat gun held 15 cm away, moving slowly. This softens the material slightly.
Sand the damaged area lightly with 120-grit sandpaper in circular motions, not back and forth.
Wipe away all dust with a damp cloth. Let it dry.
Using a Dashboard Crack Filler for Deep Damage
When you repair vinyl plastic dashboards with deep cracks and gouges, you need filler.
For deep cracks:
Apply filler with a plastic applicator or putty knife, pressing firmly into the crack and overfilling slightly.
Let the filler cure per product instructions, usually 24 hours. Uncured filler will shrink and crack.
Once cured, sand gently with 220-grit until the filler is flush.
For vinyl dashboards, use a flexible polyurethane filler that moves with the material. Standard rigid fillers fail on vinyl within months.
For plastic dashboards, standard automotive filler works fine since plastic doesn’t flex.
The difference between a visible and invisible repair often comes down to filler choice.
Sanding and Smoothing Techniques
Sanding is where most DIY repairs go wrong: too aggressive damages the surrounding finish, too gentle leaves the repair visible.
Use 220-grit sandpaper for final smoothing in small circular motions, letting the paper do the work without pressing hard.
Check your progress frequently. Run your hand across the area.
For vinyl, sand very lightly, since vinyl scuffs easily. A few light passes beat one aggressive one.
For plastic, sand a bit more firmly since it’s harder and won’t scuff as easily.
After sanding, wipe the area clean with a damp cloth. Dust will show through paint and ruin the finish.
Restoring Texture and Grain with Dashboard Texture Repair
This step separates a visible patch from an invisible repair: the texture must match the original.
Most dashboards have a grain texture, some rough and leather-like, others smoother. Match what’s there.
A grain texture pad matches common dashboard textures.
If the texture doesn’t match, try again while the filler is still slightly soft and can be re-textured.
For vinyl dashboards, the grain is usually more pronounced, so the texture pad must create a similar pattern.
Let the textured filler cure fully before painting. Incomplete curing will distort the texture.
Interior trim rejuvenation often restores the entire dashboard, not just the damaged area.
Colour Matching and Finishing Your Dashboard Repair
Colour matching is critical. Even a perfect repair is obvious if the colour doesn’t match.
Most car dashboards are black, grey, or tan, some brown or red. You need the exact shade.
Get a colour sample from the manufacturer if possible, since many car makers publish colour codes.
Dashboard dye or colour-matched paint comes in spray cans or brush-on bottles. Spray gives a more even finish.
Apply thin coats rather than one thick coat, letting each dry before the next.
Spray from 20-25 cm away. Move smoothly without stopping. Stopping creates a dark spot.
At TrimKings, colour matching is a core strength.
When to Use a Car Dashboard Repair Kit vs Professional Dashboard Repair
A dashboard repair kit works for small, shallow damage, but the decision is rarely as simple as “small damage equals DIY”. The two factors most guides ignore are reversibility and the true cost of getting it wrong.
Use a kit if:
- The damage is less than 5 cm long
- It’s a single crack or small gouge
- The colour is a standard black or grey
- You have time to let products cure properly
- You are comfortable accepting a repair that may be visible under raking light
Consider professional service if:
- The damage is large or deep
- Multiple cracks or gouges exist
- The colour is unusual or hard to match
- You need the car back quickly
- The dashboard has UV damage across a large area
- The vehicle is leased, classic, or likely to be sold within two years
Entry-level kits versus professional-grade supplies
Not all kits are equal, and the gap between budget and professional-grade supplies is wider than most buyers expect. A typical entry-level kit gives you a small tube of filler, a plastic spreader, one or two texture pads and a colour pen.
Professional-grade supplies differ in three ways that matter:
- Filler chemistry. Professional flexible fillers are formulated to stay elastic across a wider temperature range, which is what stops a repair re-cracking through a hot summer and a cold snap.
- Texture range. A single texture pad covers one grain pattern. Professional kits carry a range of pads so the repair can be matched to the actual grain rather than approximated.
- Colour system. Colour pens and rattle cans are matched by eye. Professional systems are mixed to a code, which is the difference between a repair that disappears and one that reads as a patch in daylight.
The trade-off is cost and skill: a professional-grade kit costs several times an entry-level one and rewards careful technique. For one small crack on a daily driver, an entry-level kit is often sensible. For a visible area on a car you care about, professional-grade is usually cheaper than doing the job twice.
Is a DIY repair reversible?
Almost no guide answers this, and it matters. A DIY repair is generally reversible if you used flexible filler and dye rather than a permanent coating, since a professional restorer can usually remove the filler, re-prep and start again. Much harder to reverse is a repair sealed under hard lacquer, or one where aggressive sanding thinned the original grain beyond recovery. If you may want a professional restoration later, avoid heavy sanding and permanent topcoats.
The real cost-benefit
Frame the decision with three questions:
- How visible is the repair from the driver’s seat? A crack on the passenger side of the dash top is far more forgiving than one directly in front of you.
- How long do you plan to keep the car? A repair only needs to last as long as your ownership.
- What is the downside if it fails? On a leased vehicle, a visible repair can trigger penalty charges at hand-back exceeding the cost of professional work. On a car you own outright, a failed DIY repair usually just means doing it again.
For lease vehicles, professional repair is worth the cost. Dealerships are strict about condition at lease end. A visible DIY repair could trigger penalty charges that far exceed the repair cost.
For classic or luxury vehicles, professional service protects the investment. These cars have high-end interiors that demand precision work.
The cheapest option is not the entry-level kit. It is the option that gets the repair right the first time. For small, low-visibility damage on a car you plan to keep, that is usually a kit. For anything visible, colour-critical, or on a leased or classic vehicle, it is professional work.
Frequently Asked Questions
Can you repair a cracked vinyl car dashboard?
Yes, vinyl dashboards can be repaired effectively. Small cracks respond well to flexible fillers and adhesives that move with the material. Larger cracks require surface preparation, filler application, sanding, and texture matching. The key is using products designed for vinyl rather than rigid plastics, as vinyl expands and contracts with temperature changes. Proper curing time and colour matching ensure a durable, professional finish.
What’s the best car dashboard repair kit for DIY repairs?
A comprehensive car dashboard repair kit should include sandpaper (various grits), flexible filler, degreaser, a heat gun, texture pads, and colour-matching spray. Quality kits provide everything needed for crack repairs and scuff removal. However, success depends on your skill level and the damage severity. Minor scratches and shallow cracks suit DIY kits well, whilst deep gouges, extensive UV damage, or complex texture work often benefit from professional dashboard repair services that guarantee colour matching and finish quality.
How do you match the colour of a repaired dashboard?
Colour matching requires identifying your vehicle’s exact interior code, usually found in the owner’s manual or on the driver’s side door jamb. Test spray paint on a hidden area first to verify the match under natural light. Professional dashboard repair services use spectrophotometers and multiple paint layers to achieve seamless results. For vinyl dashboards, ensure the finishing spray is flexible and UV-resistant to prevent cracking and fading. Allow proper curing time between coats before evaluating the final match.
How long does a dashboard repair take to cure and become usable?
Curing times vary by product. Flexible fillers typically cure within 24 hours, whilst adhesives may set in 2-4 hours. Finishing sprays generally cure within 12-24 hours before the dashboard is safe to touch. Avoid exposing the repair to direct sunlight or extreme temperatures during the curing period, as this affects bonding and finish quality. Professional dashboard repair services account for full curing time in their timeline, ensuring the repair is durable before you use the vehicle normally.